![[object Object]](https://res.cloudinary.com/dlwdq84ig/image/upload/w_3840,q_auto,c_scale/x1qgcm5jcooqwptm0kbq)
Backyard Grilling Basics
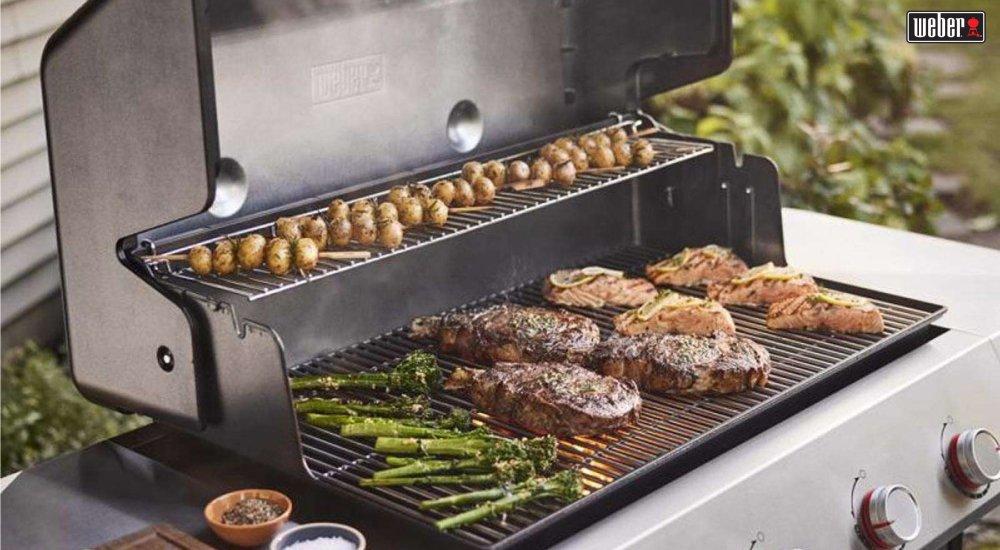
There is nothing quite like the smoky aroma of a backyard barbecue to bring families, friends, and outdoor enthusiasts together. However, stepping up to the grill can sometimes feel intimidating, whether you are managing flare-ups, trying to achieve the perfect medium-rare steak, or simply hoping your chicken breasts do not dry out. Grilling is both an art and a science, and mastering it requires a blend of proper preparation, precise heat control, and a few insider tricks.
Master Heat Control with the Two-Zone Method
One of the most common mistakes beginners make is cooking everything over maximum direct heat. Mastering your grill requires heat management, which is best achieved through two-zone heating. This setup provides an intense sear zone for flavor and a cooler indirect zone for gentle, even cooking.
Setting Up a Gas Grill
-
Heat the "Hot Zone": Set the burners on one side of the grill to medium-high or high heat.
-
Set the "Cool Zone": Leave the burners on the opposite side completely off or set to very low.
-
Sear: Place your food directly over the active burners to develop a crust.
-
Finish with Indirect Heat: Move the food to the cooler side and close the lid. This uses ambient heat to cook the inside thoroughly without burning the outside.
Setting Up a Charcoal Grill
-
Prep the Coals: Wait until your briquettes or lump charcoal are fully ignited and covered in gray ash.
-
Bank the Heat: Instead of a flat layer, use a charcoal rake to move all the hot coals to one side of the grill.
-
Establish the Zones:
-
Sear Zone: The area directly above the banked coals for high-heat cooking.
-
Indirect Zone: The empty side of the grill, perfect for gentle cooking or avoiding flare-ups.
-
Techniques for Common Foods
With your grill prepped and your heat zones established, you are ready to start cooking. Different meats and vegetables require tailored approaches to achieve the best results.
Cooking the Perfect Steak
Steaks thrive on high heat. To get a restaurant-quality crust, thoroughly pat your steak dry with a paper towel before seasoning it aggressively with salt and pepper. Moisture is the enemy of a good sear.
3-3-3 Method
-
Baseline: For 1-inch steaks, sear for three minutes per side and rest for three minutes.
-
Adjust for Thickness: Use the baseline as a starting point, but adapt for thicker cuts.
-
The Two-Step Method:
-
Direct Heat: Sear first to develop a rich, flavorful crust.
-
Indirect Heat: Move the steak to the cooler zone to finish the center without burning the outside.
-
Building Better Burgers
The golden rules of grilling burgers are simple:
-
Don’t Press: Avoid squeezing the meat with a spatula; it drains the flavorful juices.
-
The Thumb Dimple: Press a shallow indentation into the center of raw patties to prevent them from puffing up.
-
Flip Once: Cook over medium-high heat and flip only when the meat naturally releases from the grate.
Grilling Juicy Chicken Breasts
Chicken breasts are notoriously lean and prone to drying out.
-
Pound to Level: Use a meat mallet to create an even thickness so the center and edges cook at the same rate.
-
The Quick Sear: Grill over direct heat for 2–3 minutes per side to lock in color and flavor.
-
The Indirect Finish: Move the meat to the cooler side and close the lid to finish roasting gently without drying out.
Mastering Grilled Vegetables
Vegetables add vibrant color and crunch to any barbecue, but they require a delicate touch.
-
Oil and Season: Lightly coat veggies in olive oil and seasoning to prevent sticking and boost flavor.
-
Watch the Heat: Cook over medium heat and turn frequently to achieve a perfect char without burning.
-
Contain the Small Stuff: Use skewers or a grill basket for smaller items like tomatoes or mushrooms to keep them from falling through the grates.
Pro Hacks for Flavor and Perfection
Once you have the basics down, a few advanced tips will separate your cooking from the average backyard griller.
-
Use an Instant-Read Thermometer
- Guessing when meat is done leads to undercooked chicken or overcooked, well-done steaks.
-
Let Your Meat Rest
-
Transfer cooked meat to a clean plate or cutting board so the tense muscle fibers can relax and redistribute juices.
-
Tent the meat loosely with heavy-duty aluminum foil to keep it warm while the fibers settle.
-
Wait five to 10 minutes before slicing to prevent flavorful juices from spilling out and leaving the meat dry.
-
-
Add Wood Chips for Smoky Flavor
-
Soak a handful of hardwood chips, such as hickory, apple, or mesquite, in water for 30 minutes.
-
Drain the chips, wrap them tightly in a pouch of aluminum foil, and poke several small holes in the top.
-
Place this packet directly over your heat source beneath the grates. As the wood heats up, it will release aromatic smoke that thoroughly enhances your meats and vegetables.
-
Mastering the grill doesn't require years of training, just the right tools and a solid understanding of heat management. By focusing on grate maintenance, utilizing two-zone heating, and relying on a trusty instant-read thermometer, you can easily elevate your backyard cookouts. Equipping yourself with heavy-duty accessories and never rushing the resting process are the final steps toward hosting incredible barbecues all season long. For hands-on advice or guidance on the perfect outdoor kitchen setup, visit your local SCHEELS to speak with a Grilling Expert today.