![[object Object]](https://res.cloudinary.com/dlwdq84ig/image/upload/w_3840,q_auto,c_scale/x1qgcm5jcooqwptm0kbq)
How to Tape a Hockey Stick
Taping a hockey stick is a fundamental skill for any player. It is a vital way to improve your control over the puck, protect your stick, and customize your gear to fit your playing style. Here’s a step-by-step guide to taping your stick like a seasoned pro.
What You’ll Need
-
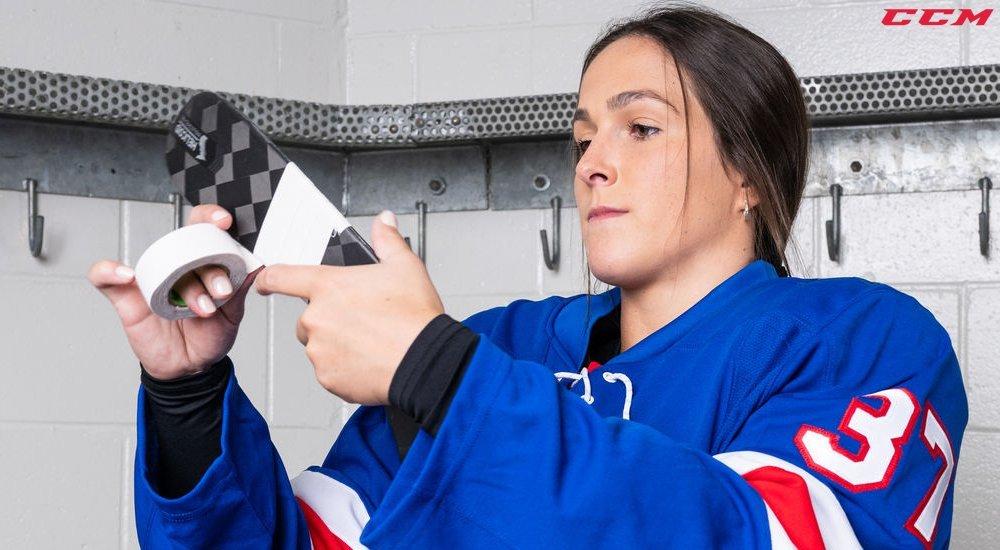
Hockey Tape: Choose a tape specifically designed for hockey. You'll need at least one roll, but having two—one for the knob and one for the blade is preferred.
-
Scissors or a Skate Blade: For clean cuts.
-
Hockey Wax (Optional): A small block of stick wax can be applied to the finished blade to help prevent snow and ice buildup and give you a better feel for the puck.
Part 1: Taping the Handle (The Knob)
The knob is the essential grip at the top of your stick that prevents your hand from sliding off. Its size and shape are all about personal preference.
- Form the Foundation: Start by wrapping the tape around the very top of the stick's shaft, building up a small, dense knob. You can make it as big or as small as you like—some players prefer a larger knob for a more secure grip, while others like a minimal one.
- Add a Ribbed Grip: For extra texture, you can create a "ribbed" or "noodle" grip. Twist a long piece of tape into a rope-like shape and spiral it down the shaft.

- Wrap Down the Shaft: Once the knob is formed and the noodle grip is in place, continue to wrap the tape down the shaft. Overlap each wrap by about half the width of the tape. The length of this grip section is also a personal choice. Some players wrap just a few inches, while others go much further down the shaft for better control.
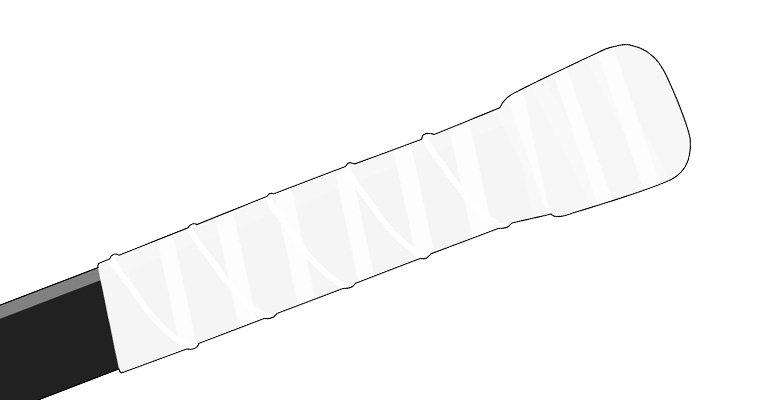
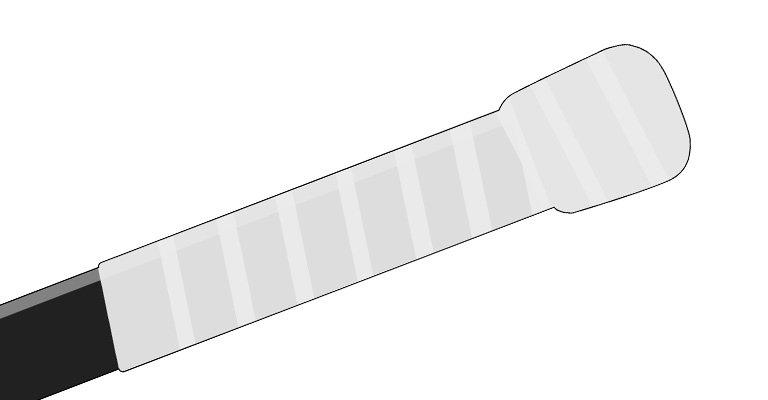
Part 2: Taping the Blade
Taping the blade is where you can truly fine-tune your stick for puck control. This tape job protects the blade and helps you feel the puck on your stick.
- Choose Your Direction: There are two main methods for taping the blade, and each has its own benefits:
-
Heel-to-Toe: This is the most common method. By starting at the heel and wrapping toward the toe, you create a smooth, clean wrap. The overlap naturally forms a slightly raised edge on the backhand side of the blade.
-
Toe-to-Heel: Some players prefer to start at the toe, which creates a raised edge on the forehand side of the blade. This can provide a little extra grip for "pulling" the puck back on the stick.
-
Wrap with Overlap: Whichever direction you choose, wrap the tape around the blade, overlapping each layer by about a quarter- to half-inch. Maintain consistent tension to keep the wrap smooth and free of wrinkles.
-
Smooth and Cut: Once the blade is fully covered, cut the tape and smooth it down, ensuring there are no loose ends.
-
Wax It Up (Optional): To finish, rub a block of hockey wax over the taped blade. This creates a tacky surface that helps grip the puck, and it also prevents snow and ice from sticking to your blade.
Why & How to Wax Your Hockey Stick
Your hockey stick's blade tape and wax are a power duo designed to work together. While you might be tempted to grab any old wax, stick with a wax designed specifically for hockey. It's built to perform in the cold, so it won't gum up your stick and slow you down.
Wax gives you a tactical advantage by coating your tape in a tacky, protective surface. Not only will you get better puck control and a better feel for the puck, but the wax also acts as a shield against moisture and ice buildup, making your tape last longer. To apply it, just take your stick wax and make 4-6 horizontal passes along the face of the blade. Flip it over and repeat the process on the back.
FAQs
How often should I re-tape my stick?
There's no single rule for this, as it depends on your position and playing style. For forwards or players who handle the puck a lot, it’s not uncommon to re-tape the blade before every game or practice. Defensemen and goalies may be able to go a few games without re-taping. The main signs that it's time for a new tape job are:
-
The tape is torn, frayed, or has holes exposing the blade.
-
The adhesive is worn down, causing the puck to slide or flutter off the blade.
-
The tape is waterlogged or full of snow and ice.
What kind of tape should I use?
The most common tape for a hockey stick is cloth tape. It’s a durable, woven fabric with a strong adhesive that’s perfect for wrapping the blade and creating a knob on the handle.
For your handle, some players also prefer to use pre-made grip tape or textured wraps. These are a great alternative to a traditional cloth knob, offering a comfortable, non-slip feel and a consistent grip every time.
Expert Tip: Do not use clear tape on your stick. That tape is specifically designed to secure your shin pads and socks in place, not to withstand the wear and tear of a stick blade.
If you have more questions about how to tape your hockey stick, stop by your local SCHEELS and speak with a Hockey Expert.