
How to Mount a Scope
Before you step into the field or firing range, ensuring your rifle scope is properly mounted is key to making every shot accurate. Whether you use a Picatinny, Cantilever, or Weaver setup, our Experts walk through everything you need to successfully mount your rifle scope.
Setting Up Your Workspace
Having the right workspace is the first step towards a successful mounting setup.
Essential Tools
-
Torque Wrench: This is a non-negotiable tool, specifically one that measures in inch-pounds.
-
Bubble Level: One is essential, but multiple are preferred.
-
Gun Vise or Stabilizer: Keeps the rifle level and immobile while adjusting.
Choosing Your Mounting System
Understanding your hardware is the first step to mounting it. Here are the common systems you'll find:
-
Picatinny: The standard for modern rifles. Features uniform, wide slots.
-
Weaver: An older and slightly narrower system, typically spaced specifically for the rifle's receiver.
-
Cantilever: One-piece mount that pushes the scope forward, essential for AR-style rifles to achieve proper eye relief.
-
Leupold Standard (STD): Classic system often found on bolt-action hunting rifles.
Stabilize Your Rifle
Before you begin mounting, ensure your rifle is completely stable and level. You cannot accurately level an optic to a rifle that is tilting or moving.
Use a Solid Platform
A high-quality gun vise will hold your rifle in place by clamping it, allowing you to use both hands for the scope. If you don't have a vise, a set of bipods and sandbags can also work.
Make it Level
Set your first bubble level on a flat part of the rifle's receiver or mounting rail. Adjust the rifle in your vise or setup until the bubble is perfectly centered.
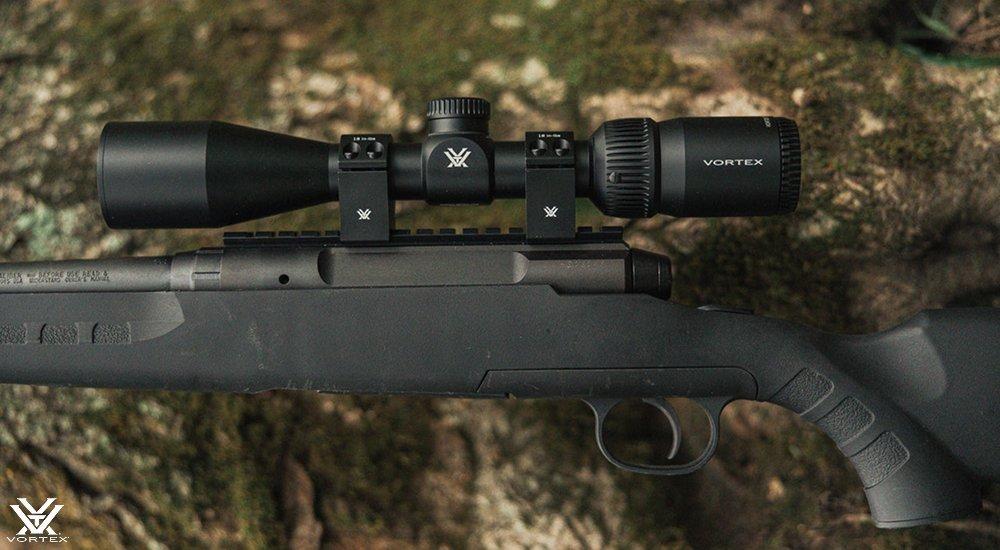
Mounting a Single-Piece Picatinny Rail
Picatinny rails offer the most flexibility. Here are the steps to mounting this system:
-
Dry Fit: Start by removing the ring caps and placing the bottom halves on the rail—don't tighten them yet. Place your scope in the cradles to ensure the rings are spaced correctly for your specific optic. This may take some adjusting.
-
Alignment & Muzzle Pressure: Once you find the right placement, lightly tighten your rings to the rail. Apply forward pressure to the rings in the direction of the muzzle to ensure the recoil lugs are tucked firmly against the front of the rail slot, preventing the scope from sliding forward during recoil.
-
Verification: Slide the optic back and forth inside the rings; it should move smoothly without binding.
Expert Tip: When leveling, the screws should be loose enough to rotate your scope with slight resistance.
Mounting a Cantilever / AR-Style Mount
Standard for AR-15 platforms, cantilever mounts bridge the gap between the receiver and handguard.
-
Leveling the Fixture: When using a one-piece mount, it's best to use a dead-level fixture. Ensure the fixture itself is perfectly leveled before placing the mount on it.
-
Center the Turret: Place the scope in the mount and rotate it to a proper fit. Position the scope so the turret housing is centered within the cradle mount.
-
Internally Level: If your optic has a removable turret cap, take it off to place the level on the flat surface.
-
Torquing the Specs: Once your levels are set, set your torque wrench to the manufacturer's setting (typically 15-18 in-lbs). Tighten the ring cap screws in a crossing pattern.
Mounting a Two-Piece Weaver Style Rail
For traditional hunting rifles, two-piece rails are most common. Since they aren't one continuous rail, alignment is even more critical.
-
Ring Placement: Place your rings on the rail sections. You may have limited mounting points depending on your firearm. Just like with Picatinny rails, apply forward pressure toward the muzzle while tightening the bases to the rail.
-
Checking for Binding: Ensure the optic slides smoothly inside the ring sections before putting the caps on. If it's difficult to slide, your rings may not be perfectly parallel.
Mounting a Leupold Standard Mount
The Leupold Standard system allows for coarse windage adjustments directly in the base, saving your scope's internal adjustments for fine-tuning.
- Installing the Front Ring: The front ring features a dovetail lug. Insert the ring into the front base at a 90-degree angle to the barrel. Use an alignment tool to rotate the ring until it's perfectly aligned with the barrel.
Note: Never use the scope itself as a lever to twist the ring into place.
-
Installing the Rear Ring: Held in place by two large opposing screws, the rear rings sit flat on the rear base.
-
Coarse Windage Adjustment: If your rifle's mounting holes aren't exactly centered, use the rear base screws to shift the rear ring left or right. Once aligned, tighten the opposing screws to the manufacturer's torque settings.
Eye Relief & Leveling
No matter which mounting system you use, the following steps will determine the success of your setup.
How to Set Eye Relief
-
Set your scope to its highest power.
-
Position your rifle as if you are going to shoot and look through the scope.
-
Move the optic forward or backward. You want to see a clear image that fills the eyepiece.
Expert Tip: If there are any shadows around the edges, it is not properly set. Continue adjusting until the picture is completely clear.
Level & Tighten
-
Place one bubble level on the rifle's rail and a second on the top elevation turret. Adjust the scope until both bubbles match perfectly.
-
Once leveled, tighten the screws in a crisscross pattern, moving from front-left to back-right, then front-right to back-left. This will prevent the scope from twisting as you apply pressure.
Final Check
Once everything is torqued, re-check your levels one last time. If the bubbles are still centered, you're ready to zero your rifle.
With your rifle scope properly mounted, you're one step closer to taking on the season ahead. If you have any additional questions on your rifle scope, the mounting process, accessories, or other shooting topics, head into your local SCHEELS to speak with an Expert!